iOS End-to-End Testing in a Nutshell
Recently we had the necessity to start testing our iOS application with integration tests, more known as “end-to-end” tests. So we came with a simple yet beautiful approach.
Introduction
Over the past 11 years we’ve been crafting a majestic Ruby on Rails monolith that serve our purposes. It goes from handling web requests to mobile API requests. A monolith that has an extensive test suite that uses rspec with capybara to perform integration tests. It took all this time to code not only this monolith, but also this testing framework that allows us to sleep well at night.
On the other hand, our mobile app testing consisted of: a scarce set of unit tests within the same repository, and a separate repository that performed a reduced amount of integration tests using appium.
This mobile test suite was using our staging servers to run the tests in two clearly separated stages: first create all the background data needed for all the tests to run, and then run all tests.
But we needed something better.
Challenges
Having a test suite that uses external servers as the single source of truth introduced multiple drawbacks. The most notable were:
- Performance. Tests performed multiple API requests against an external server. This made local test executions slow as they needed an active internet connection.
- Independence. The execution of one scenario was dependent on this exhaustive initial data setup. This setup created all the necessary data for all the available scenarios. Even if you wanted to run one single scenario, you had to wait until all the data for all tests was created. This makes testing development slow.
- Isolation. We had to hope that the background data was going to be exactly as we wanted it to be. If a prior test failed leaving data in an inconsistent state, there was no guarantee whatsoever that subsequent tests were going to pass. One failing scenario could potentially make the whole suite of tests fail. This makes testing development non trivial as you have to write tests that don’t modify data, therefore losing many use cases, or have to make sure tests run in a “safe” sequential order making them dependent one of the other. If one test fails, don’t run consequent ones. This makes testing troubleshooting slow.
- Idempotence. Due to the isolation drawback, tests weren’t idempotent either. There was no guarantee that a test would produce the same outcome each time it run. This makes test debugging a lot harder as the same test could pass while working with different data sets.
What we wanted
Having our web testing framework working smoothly, we didn’t want to re-invent the wheel in order to test our mobile applications. In the end, a mobile application is not more than a different UI client on top of the same (or similar) business logic as the web UI. So we wanted to reuse as much as we could.
Here’s a list of things we aimed for:
- A mobile developer should be able to add a test and commit them within the same pull request as the code being tested. No separate testing project. This helps in making sure tests are mandatory. One pull request would have everything, therefore being easier to review.
- Each test being run should start with a fresh set of data that is only related with that test. This means we could run the same test N times and the outcome would be the same.
- We should be able to use the same testing framework developed for our web application (factories, scripts, support files, etc). This way we allow data to be created/destroyed on each test run without duplicating code.
- Use appium as a way to interact with a mobile simulator. Appium is a testing driver that does similar things to what selenium does for the web.
- Tests should run on our local setup. No external servers whatsoever. They should start a local web server that exposes all the APIs that the mobile app needs, and the mobile app being tested should hit those APIs.
To tackle all these requirements, we came up with a clean setup. It requires 6 steps, but it definitely worths it.
1. Symlinks to the rescue
You might say: “what? symlinks?”. Yes, symlinks. The pure action of creating a “mirror” facing a folder or file in your file system is very much underrated.
We chose this path because:
- We didn’t want to duplicate the web testing code.
- We didn’t want to move all the web testing framework to a separate repository, therefore we couldn’t use git submodules.
- We didn’t want to use git subtrees as they are hard to reason.
- We wanted this to be as less intrusive as possible for our web project.
So this is what we did:
- Created a test/integration folder within the mobile project root folder.
- In that folder created a install.sh script within an exe folder with the following code:
#!/bin/bash

# Change this path to be pointing to your local web app repository.
WEB_APP_PATH='../../../web_app'

# Copy & alias web app files & folders
ln -sf $WEB_APP_PATH/Gemfile
ln -sf $WEB_APP_PATH/Gemfile.lock
ln -sf $WEB_APP_PATH/.ruby-version
ln -sf $WEB_APP_PATH/.rspec
ln -sf $(pwd)/$WEB_APP_PATH/spec/integration_helper_core.rb ./spec/integration_helper_core.rb
ln -sf $(pwd)/$WEB_APP_PATH/spec/factories ./spec/factories
ln -sf $(pwd)/$WEB_APP_PATH/spec/support ./spec/support
install.sh
In this script, we are first mirroring setup sources from our web project by symlinking the Gemfile, Gemfile.lock, .ruby-version and .rspec file.
Then we symlink an integration_helper_core.rb file. This file is similar to the spec_helper.rb suggested by the rspec gem. It basically contains all the setup needed by capybara -screenshots saving, before and after hooks to create/destroy the database, web server setup, etc- that will be shared by both our web and mobile testing projects. This file will live in our spec folder, so you should create this folder before running the install script or you’ll get a “folder/file not found” error.
Finally we symlink the parts of the web testing framework we need: factories & support files.
We also introduced an uninstall.sh script that allows us to remove all these symlinks created:
#!/bin/bash

# Remove aliases of evolve
unlink Gemfile
unlink Gemfile.lock
unlink .ruby-version
unlink .rspec
find spec/. -type l -exec unlink {} \;
uninstall.sh
At this point, your folder structure should look like this:
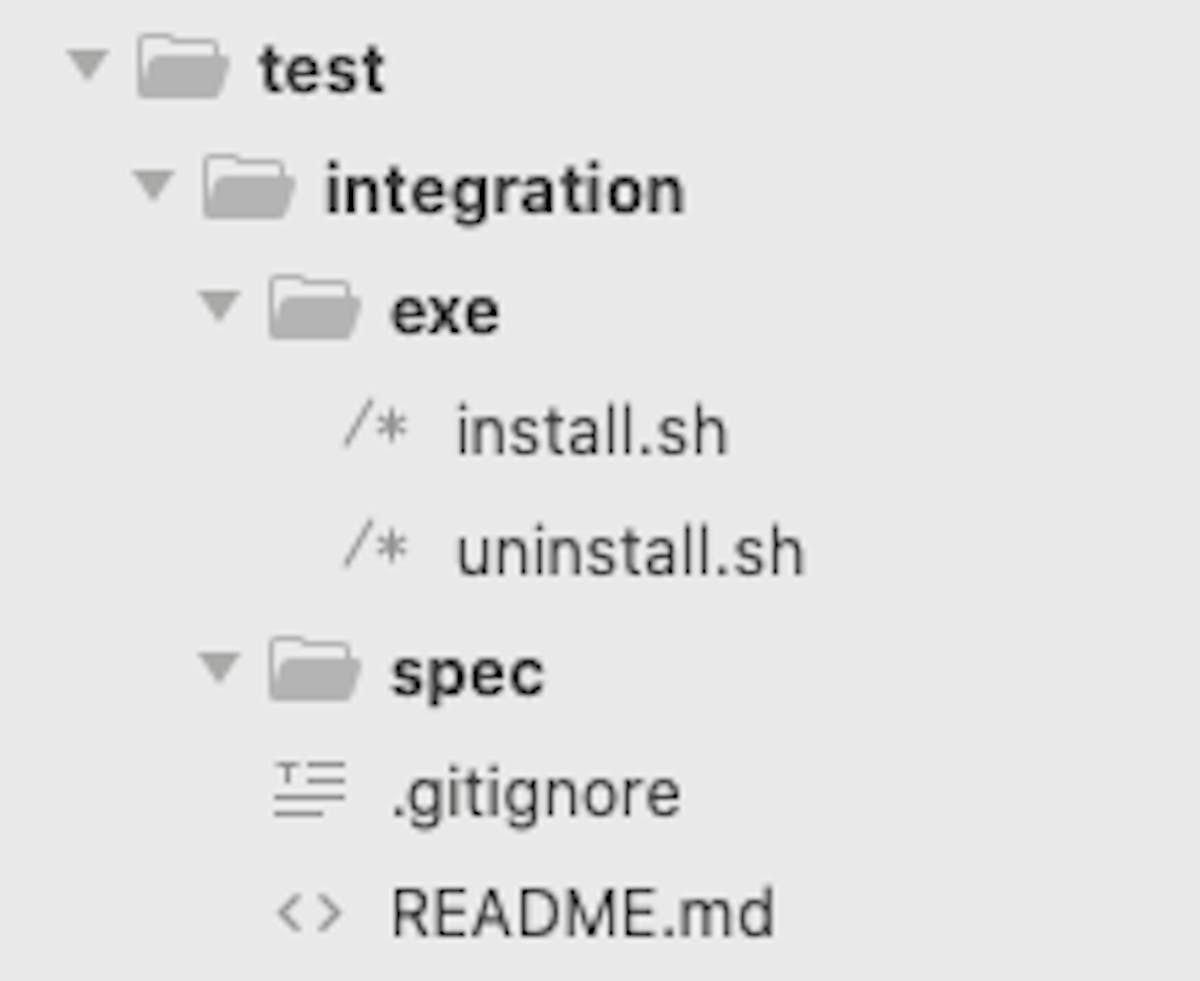
Folder structure before installing the test framework
We are now officially ready to install our testing framework. So standing on thetest/integrationfolder and executingexe/install.shwould result in the following files and folders:
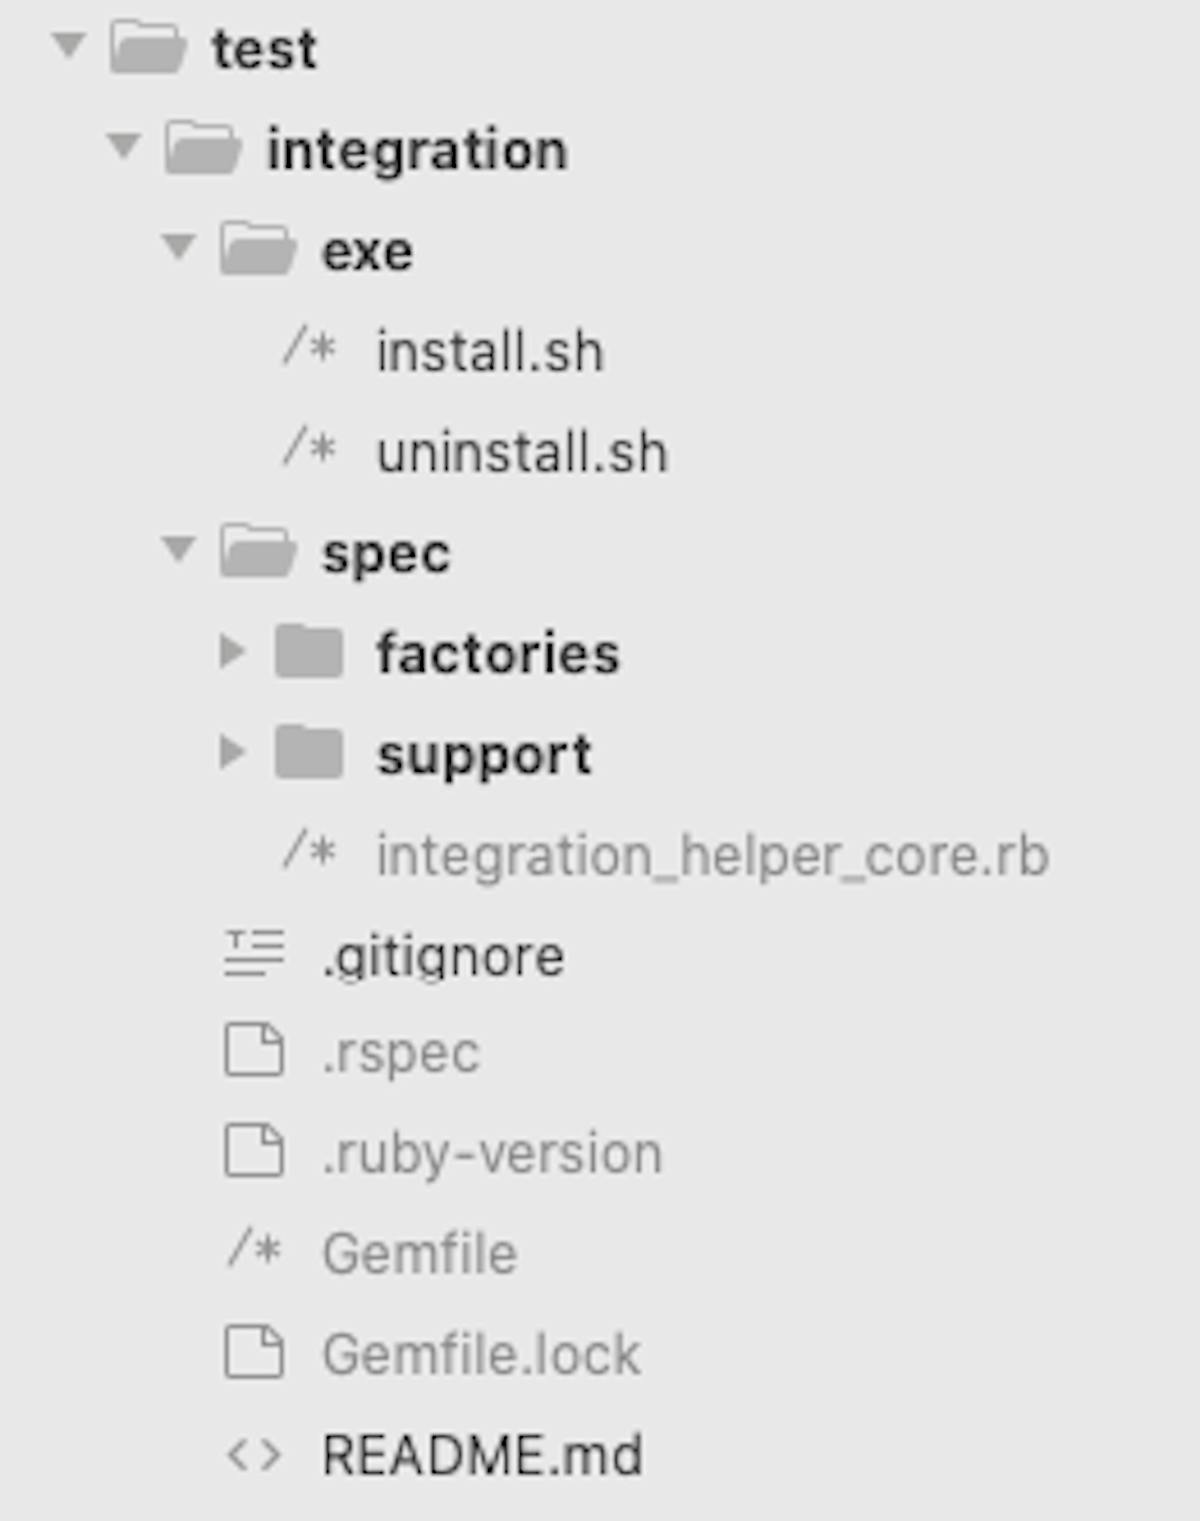
Folder structure after installing the test framework
Given that we don’t want to commit all these symlinks to the mobile app repository, the .gitignore file contains the following:
Gemfile Gemfile.lock .ruby-version .rspec spec/integration_helper_core.rb spec/factories spec/support build
2. Building the test binary
It’s desirable that any mobile project has its own build target for testing. In our case, we have a build target called “Test” that generates a binary with a hardcoded API base url identical to the one exposed by rspec/capybara when starting the web server. So next step you’ll have to do in your iOS app is to create a new build scheme. I’m not going to dig too much into how to configure a build scheme in an iOS app. I’m not a mobile expert and it would make this post beat around the bush.
After having the build scheme and our generation process properly configured, we need a command-line-way to run the build so it can be used by our CI tools before running tests. This is why we added a build.sh file under the exe folder with the following content:
#!/bin/bash

# Script that generates a new MobileApp local app.
# The executable will be placed in "build/Build/Products/Debug-iphonesimulator/MobileAppT.app"
pod install
xcodebuild -workspace ../../MobileApp.xcworkspace -scheme MobileApp\ \(T\) -configuration Debug -sdk iphonesimulator -derivedDataPath build build | xcpretty
build.sh
Note that our .xcworkspace file is called MobileApp and our build scheme is MobileApp (T). You should replace those two things with your own names.
After running this script by executing exe/build.sh, you should see the generated binary in this path:
test/integration/build/Build/Products/Debug-iphonesimulator/MobileAppT.appFinally, after running this step, your folder structure should look something like this:
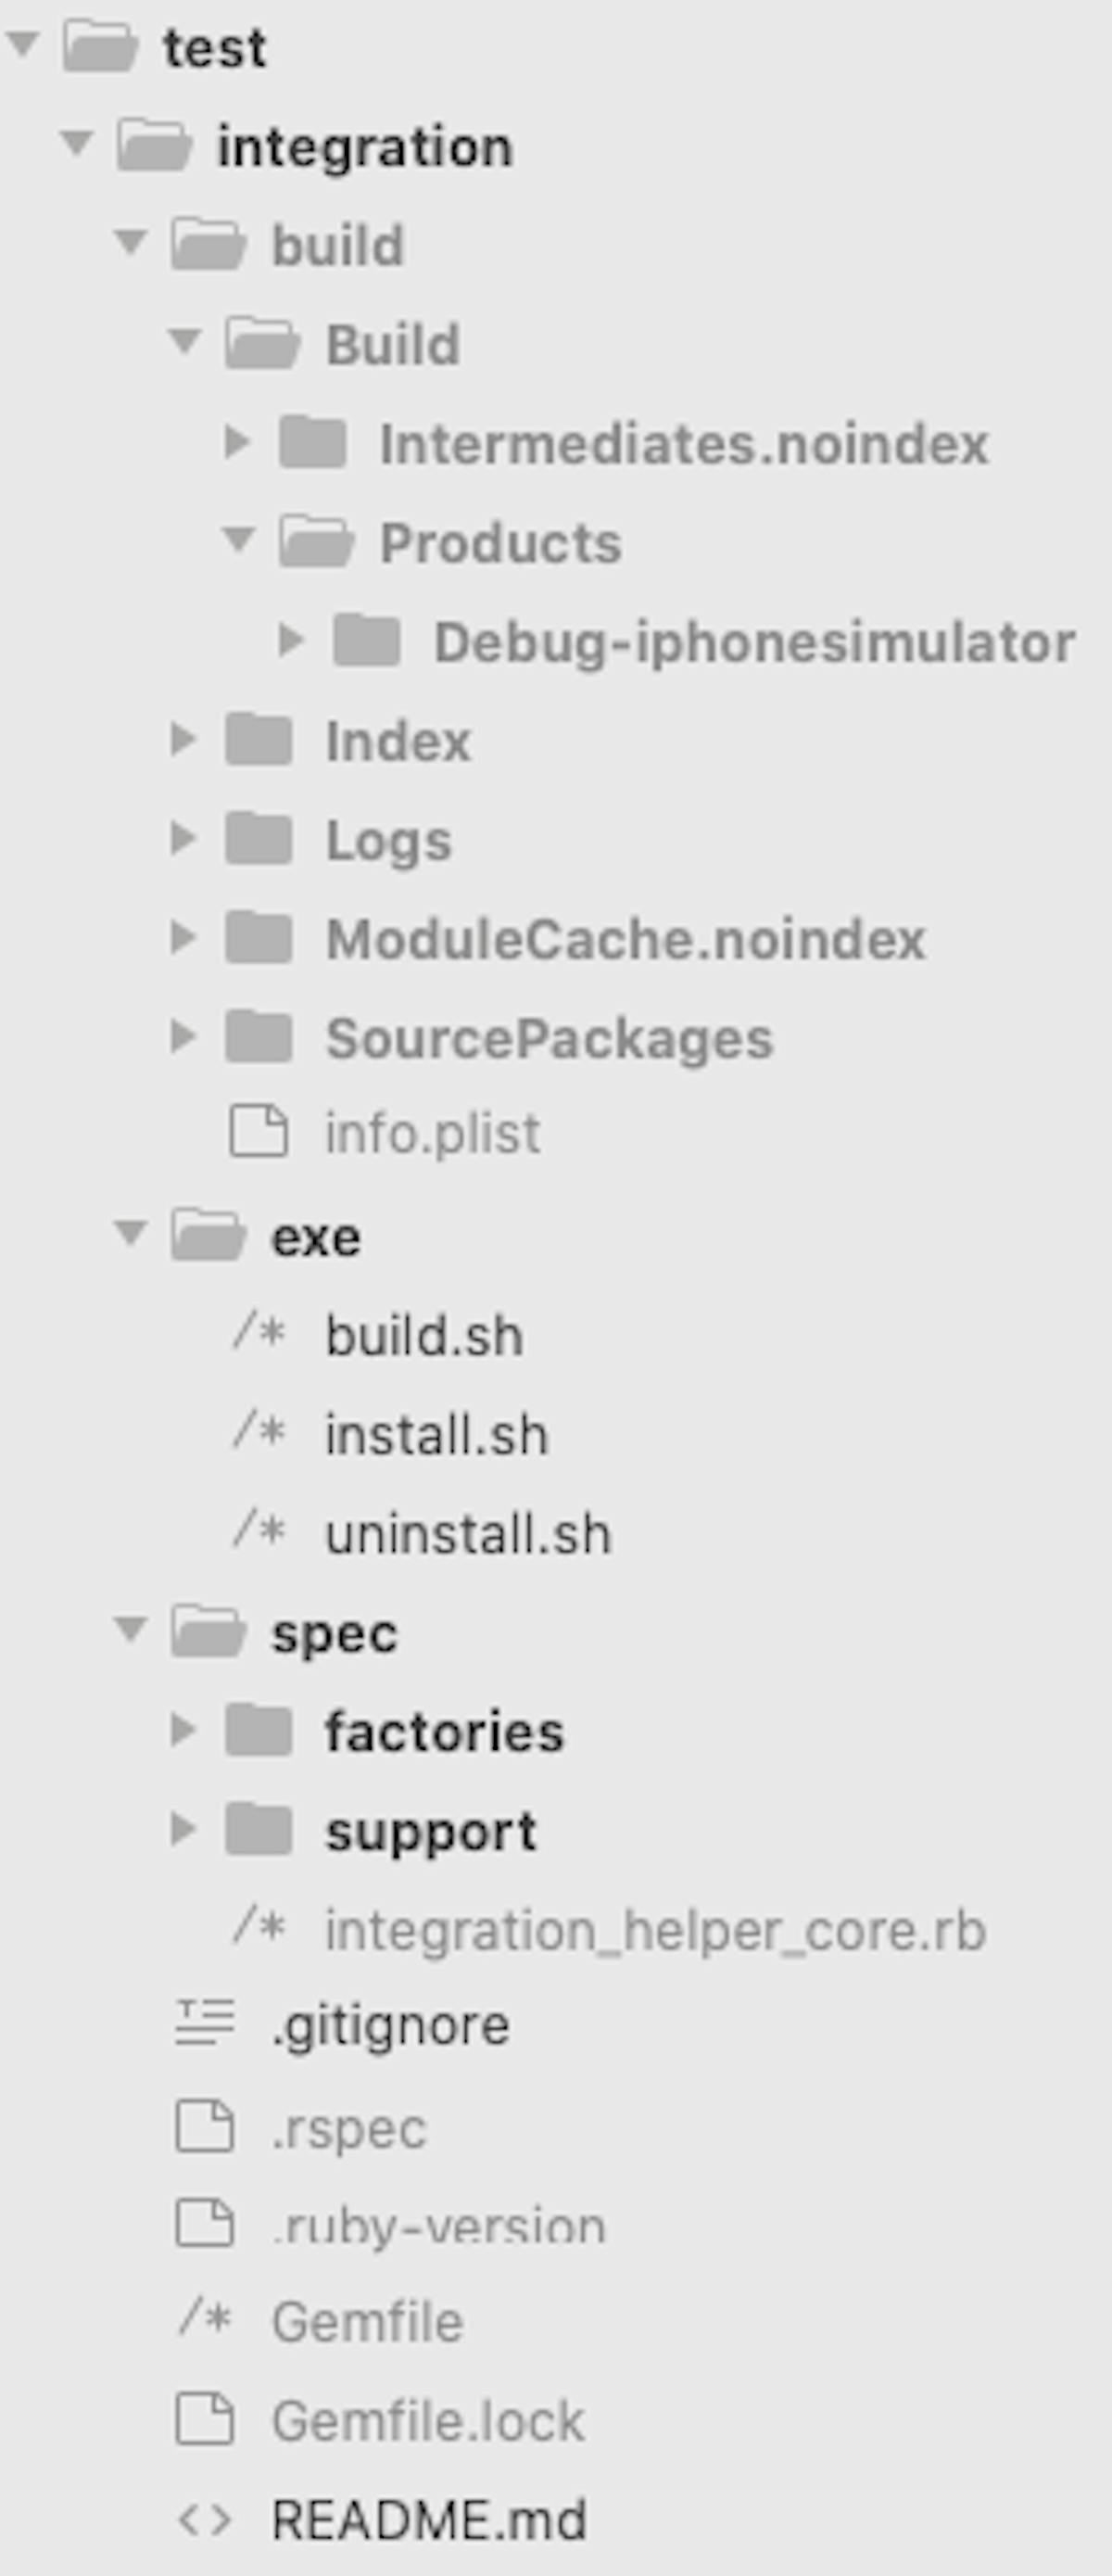
Folder structure after adding the build step
3. Appium setup
In the first step we symlinked the Gemfile of the web project to be used by the mobile testing porject, so you’ll need to add the appium gems in the web project Gemfile:
group :test do
  ....
  # Mobile testing
  gem 'site_prism', require: false
  gem 'appium_lib', require: false
  gem 'appium_capybara', require: false
  ...
end
SitePrism is used to be able to target UI elements within each of the mobile app screens. It will allow us to fill in a text input, for example.
Note that we’re adding a require: false keyword so that we can require them on demand. We’re only going to use these libraries for our mobile testing purposes, so we don’t want them being included in our web project by accident.
After appium has been added to the web project Gemfile, we will need to create two file: config/appium.txt containing some appium configuration settings, and spec/appium_helper.rb similar to a spec_helper.rb but with basic appium setup.
[caps]
platformName = "iOS"
deviceName = "iPad Pro (9.7-inch)"
platformVersion = "13.3"
app = "build/Build/Products/Debug-iphonesimulator/MobileAppT.app"
automationName = "XCUITest"
newCommandTimeout = 0
useNewWDA = false
showXcodeLog = false
shouldUseSingletonTestManager = true
appium.txt
Note that you’ll have to replace the app variable with the path to your testing binary.
# appium_helper will be an extension of banff#integration_helper_appium
require 'integration_helper_core'

require 'site_prism'
require 'appium_lib'
require 'appium_capybara'

caps = Appium.load_appium_txt file: File.join("#{Dir.pwd}/config", 'appium.txt'), verbose: true

Capybara.register_driver(:appium) do |app|
  all_options = caps.merge(
    appium_lib: {
      server_url: "http://localhost:4723/wd/hub"
    },
    global_driver: true
  )
  Appium::Capybara::Driver.new app, all_options
end

# Overriden configuration for new tests.
Capybara.configure do |config|
  # It's the most commonly used driver.
  config.default_driver = :appium

  # The recommended approach in Capybara.
  config.match = :smart
  config.exact = true
  config.ignore_hidden_elements = true
end
appium_helper.rb
You might have noticed already that we’re using appium with capybara. But in case you didn’t, here’s the project repository.
4. SitePrism setup
An important thing already mentioned is that we are using SitePrism to interact with the elements in our screens. It adds an abstraction layer that is very easy to reason about.
So following some RoR good practices, we added all our screens in spec/screens and added a base_screen.rb class so that we can have a place to write common behavior across all screens. Also, for the sake of this demonstration, we are adding a login_screen.rb screen that will be used down the road.
After adding these two classes, our spec folder looked like this:
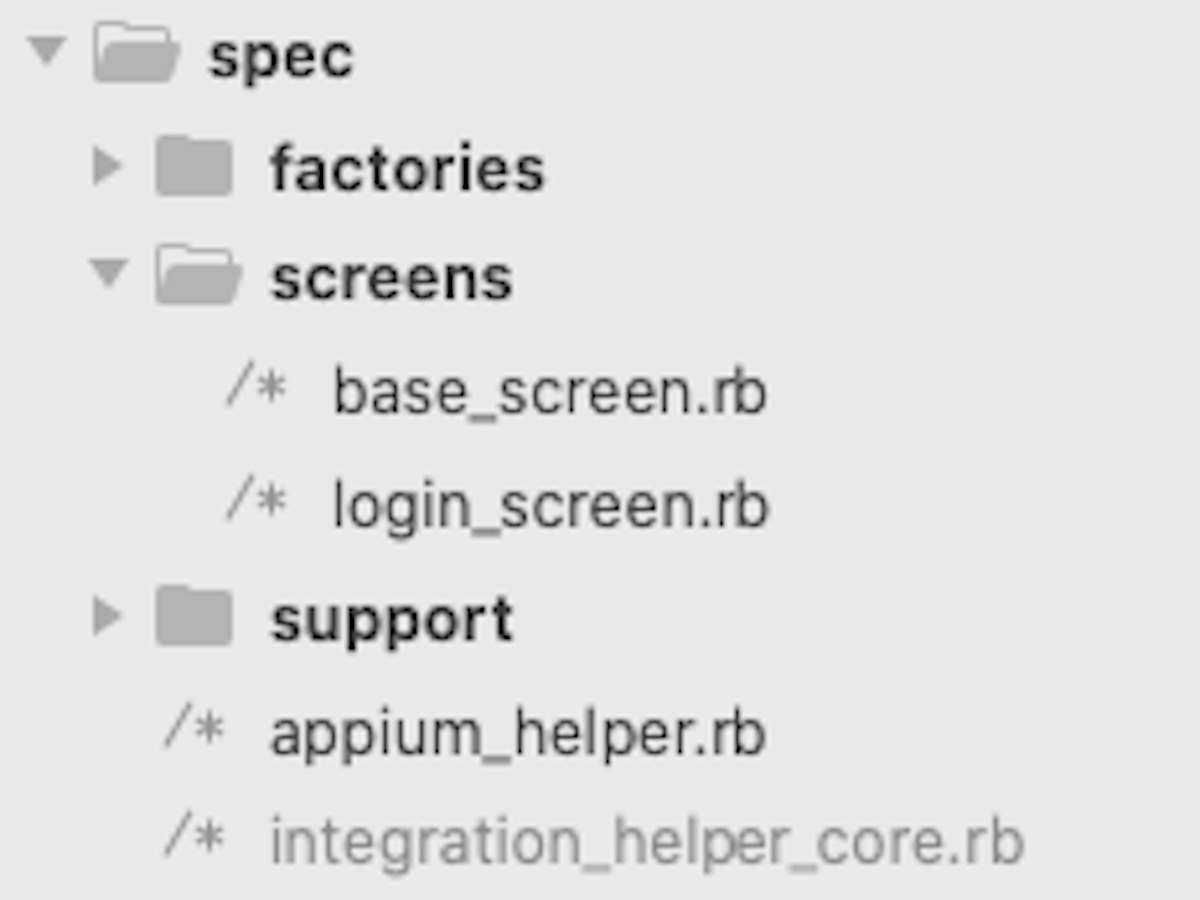
Spec folder after adding SitePrism screens
And this is how this two classes looked like:
class BaseScreen < SitePrism::Page
end
base_screen.rb
class LoginScreen < BaseScreen
  element :email_field, :class, 'XCUIElementTypeTextField'
  element :password_field, :class, 'XCUIElementTypeSecureTextField'
  element :login_button, :xpath, "//XCUIElementTypeButton[contains(@name,'Login')]"

  def login_as(user)
    email_field.click
    email_field.send_keys user.email
    password_field.click
    password_field.send_keys user.password
    login_button.click
  end
end
login_screen.rb
See how beautifully simple is this action-driven way of coding screens. Later, when writing a test, we will be able to do something like login_screen.login_as(user).
Besides adding our screens, we also want to have a helper to be able to easily include them in our tests. So we came up with this screens_helper.rb module that we located under our spec folder:
# Public: A helper that allows us to load screen on demand with a nice DSL.
#
# After including this file in `appium_helper.rb`. We can call `get_screen(screen_name)` and that
# will expose a variable in the test containing an instance of the wanted screen.
module ScreenHelpers

  # Internal: Requires a screen file and memoizes the class for all tests.
  def get_screen_class(name)
    file_name = "#{ name }_screen"
    ivar_name = "@#{ file_name }"
    instance_variable_get(ivar_name) || begin
      require File.join("#{Dir.pwd}/spec/screens", file_name)
      screen_class = file_name.camelize.constantize
      instance_variable_set(ivar_name, screen_class)
    end
  end

  # Public: Returns an instance of a screen.
  #
  # NOTE: Memoizes the screen instances, keeping one per test helper class.
  def get_screen(screen_name)
    ivar_name = "@#{ screen_name }"
    instance_variable_get(ivar_name) ||
      instance_variable_set(ivar_name, get_screen_class(screen_name).new)
  end
end

# rubocop:disable Style/MixinUsage
include(ScreenHelpers)
# rubocop:enable Style/MixinUsage

World(ScreenHelpers) if defined?(World)

RSpec.configure do |config|
  config.include(ScreenHelpers)
end

require File.join("#{Dir.pwd}/spec/screens", 'base_screen')
screen_helpers.rb
Note that to make use of this module you’ll need to require this file in the appium_helper.rb.
5. Tests setup
To run our tests we created a small DSL that allows us to have a fast way of defining feature specs and extract some common setup across all tests. It encapsulates the rspec feature function and exposes a global one of our own that introduced handy shortcuts. We placed it in our appium_helper.rb and it looks like this:
# screen_helpers allows us to easily include screen instances in our tests.
require 'screen_helpers'

# Public: A DSL to simplify integration testing in mobile.
#
# helpers - Test Helpers that should be available as variables in the test.
# permissions - Which permissions the current user should have in the test.
# authenticated - Use authenticated: false to skip authentication.
# user - Which factory to use to instantiate the current user.
def self.feature(name, *args, screens: [], **options, &block)

  # The following can be provided as metadata in feature and scenario definitions.
  default_options = {
    authenticated: true,
    permissions: [],
    driver: :appium,
    caller: caller, # To allow RSpec to infer the actual test location.
    user: :user, # The default user factory.
  }

  RSpec.feature(name, *args, **default_options, **options) do
    # The following can be overriden in features and scenarios as needed.
    given(:permissions) { |example| example.metadata.fetch(:permissions) }

    # Expose an account and a user to be used by all tests
    given(:current_account) { FactoryBot.create(:account) }
    given(:current_user) { |example|
      # Provider Role that will be used in the mobile_user factory
      FactoryBot.create(:account_role,
        name: 'Mobile User',
        accountr: accoount,
        permissions: permissions + [:mobile],
      )
      FactoryBot.create(:user, accounts: [account])
    }
    alias_method :account, :current_account
    alias_method :user, :current_user

    # Screen helpers are made available as methods of the same name.
    # NOTE: Be careful not to use those names for test variables!!
    ([:login] | screens).each do |screen_name|
      given(:"#{screen_name}_screen") { get_screen(screen_name) }
    end

    # Easy and fast login that doesn't use the UI for integration tests.
    before(:each, :authenticated) { login_screen.login_as(current_user) }

    instance_exec(&block)
  end
end
appium_helper.rb
This function is doing some things for us:
- Creating an account and a user of our app using FactoryBot. It also allows to pass certain permissions to restrict user access to our app.
- Instantiate screens on demand for our tests
- If an authenticated option is passed to the feature declaration, we log in the user to the app before running the test.
Note that this function was implemented to fulfill our needs. You may want to have your own flavor of it.
6. “Hello world”
Now that we have capybara, rspec, appium, SitePrism and a small DSL to make our life easier, we’re ready to start kicking. So let’s get on with it.
We can start by writing a small proof-of-concept test that validates the logging in flow of our mobile app. We put all our feature specs in a folder called features and our first test looks something like this:
require 'appium_helper'

feature('Shows Landing Screen After Loggin In',
  screens: [:login, :landing]
) do
  context 'login' do
    scenario 'should show the landing screen after successfully logging in' do
      # Log in. `user` was exposed as part of our `feature` function.
      login_screen.login_as(user)

      # Wait for the landing screen to appear for 5 seconds, if it doesn't appear, error out.
      landing_screen.wait_until_search_field_visible(wait: 5)
    end
  end
end
login_screen.rb
And if you’re curious, our landing screen looks like this:
class LandingScreen < BaseScreen
  element :search_field, :class, 'XCUIElementTypeSearchField'
end
landing_screen.rb
And that’s it! Our first test is ready to roll out.
The folder structure after following all these steps should look something like this:
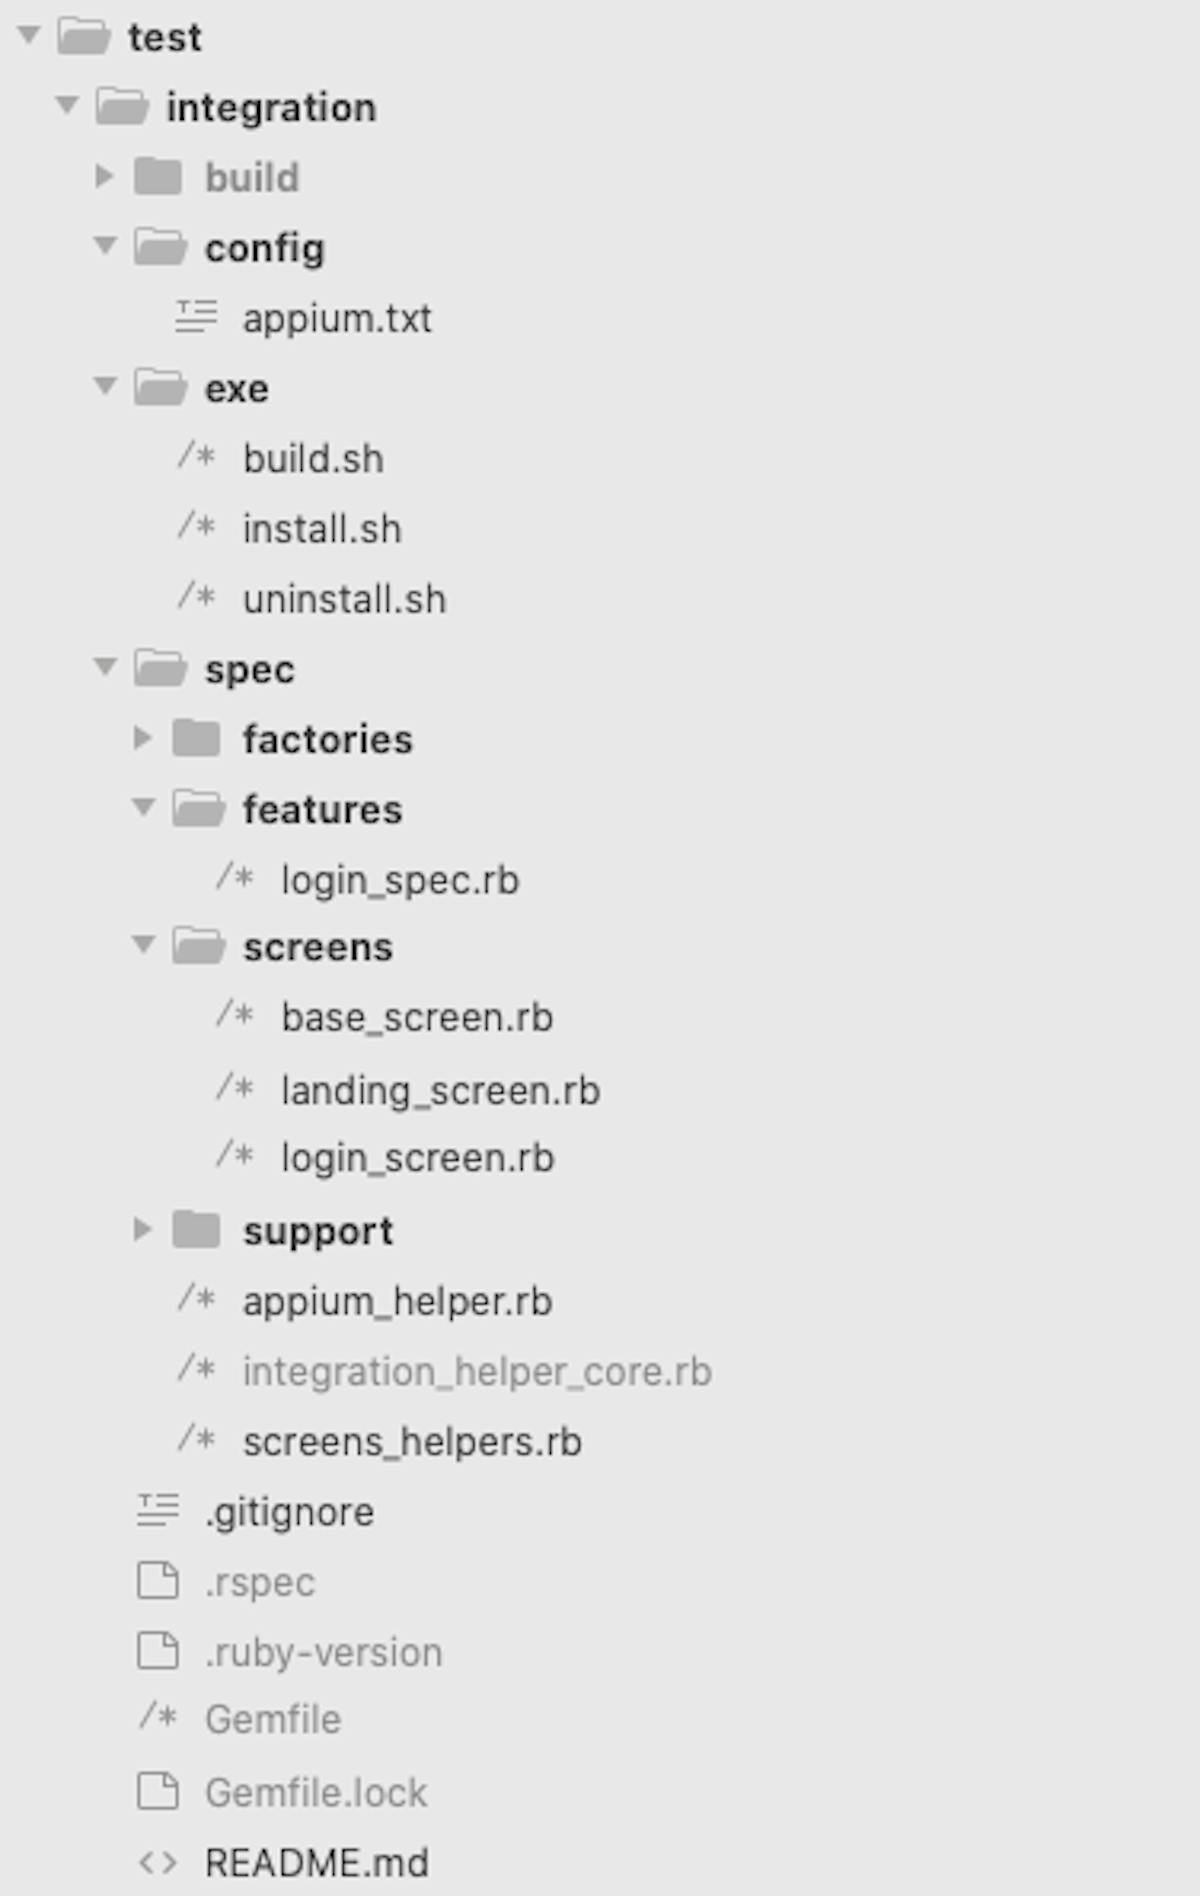
folder structure after the whole setup is complete
Now you are able to run this first test by simply doing:
$ rspec spec/features/login_spec.rb
Takeaways
Mobile end-to-end testing is not trivial. The resources out there aren’t plentiful and it requires a deep thinking time. Many mobile projects don’t have integration tests due to this, so there’s a vast field out there to explore.
This project aimed to tackle end-to-end testing without the need of fixtures or mocks, which in many cases are hard to keep in sync with reality. By including what we needed from our web testing project we were able to run this type of tests in our locals without hassle. Yes, it has some hard-requirements like needing to checkout the whole web project -or the API project- before being able to set it up. But in an era where you lift a rock and find a full stack developer, this shouldn’t be a thing oblivious to reality. Many mobile devs are also building the backend APIs these days.
As a final reflection, sometimes you may be ok by using out-of-the-box solutions for your problems. But sometimes you just go in circles trying to integrate them. It’s right then when you have to stop and start over. Start from the green grass. Start by thinking out of the box, analyzing what you have and what needs to be done. If you do this more often you’ll find it rewarding for three very important reasons:
- It’ll allow you to tackle your needs and your needs only.
- You’ll also make code easier to maintain and understand in the long run.
- You’ll learn something new.
Hope this helps you in some way.